How to Integrate Push Notifications in Unity Games:A Comprehensive Guide?
-
 Eric Wei
- 5 Min To Read
- 28 Jun, 2023
Push notifications play a pivotal role in enhancing user experience and engagement in Unity games.
This article provides a comprehensive guide on how to integrate push notifications in Unity games, with a focus on avoiding library conflicts that can hinder productivity.
Table of Contents
- Why do External Dependency Managers Cause library conflicts?
- How to avoid library conflicts for building Android games in Unity?
- What are Push Notifications?
- 4 Steps to Integrate Push Notifications for iOS and Android
- Summary
Before we get started, we will explore two common questions causing library conflicts.
Why Do External Dependency Managers cause library conflicts?
Every time you start the Unity Editor, the External Dependency Manager checks your codes and third-party libraries, then attempts to download and update all dependent libraries.
While this sounds beneficial, it can lead to instability in your dependent libraries.
The library versions will keep adjusting to meet certain conditions at that moment, which can lead to game-breaking issues with invalid functions without even awareness.
How to avoid library conflicts for building Android games in Unity?
Since the External Dependency Manager is the root of this issue, the solution might be to avoid using it.
However, if you must use it, you can either create your own native plugins to directly integrate with SDKs or avoid using it for two different SDKs simultaneously.
But developing a native plugin for iOS or Android requires native app experiences wihch can be very challenging.
Fortunately, I found Push Notification can easily solve this issue without installing External Dependency Manager in Firebase Unity SDK.
What are Push Notifications?
[Push Notifications](https://docs.unity.com/push- notifications/en/manual/WhatArePushNotifications) is Unity’s backend service released in 2022 that allows you to effortlessly integrate push notifications for iOS and Android without installing Firebase Unity SDK and External Dependency Manager.
You can make use of this service to send rich messages with texts and image URLs to engage players.
Regarding the pricing, it will be planned to be a premium feature.So you will need a Unity developer account in Plus, Pro, or Enterprise in the future.
Let’s start to integrate with Push Notification in just a few steps.
4 Steps to Integrate Push Notifications for iOS and Android
- Install the Push Notifications SDK:
Open Unity Editor → Project Settings → Project Settings → Package Manager → Package Manager → Enable pre-release packages

2. Upload your service keys
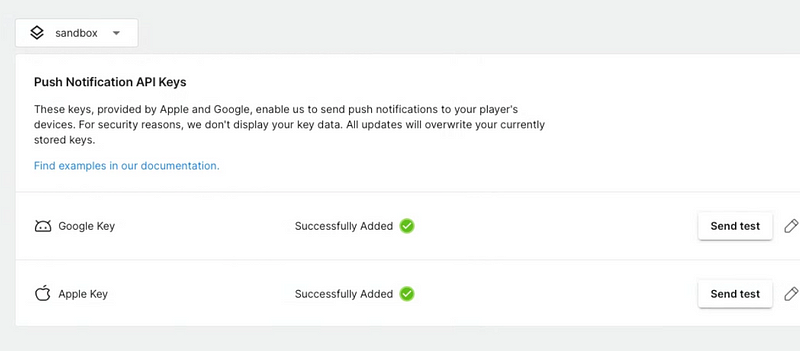
Log in to Unity Dashboard → Select LiveOps
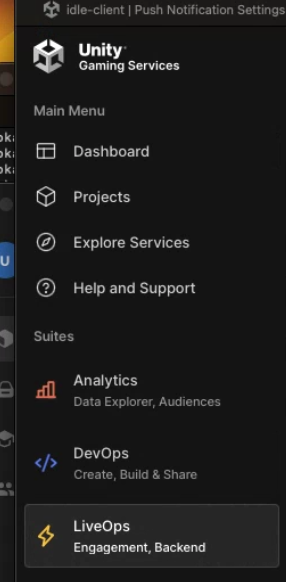
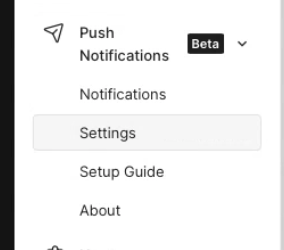
Under Push Notifications → Select Settings
Select environment → Select sandbox for example

Find an editor icon and click it for setting up iOS or Android
Setting up iOS:
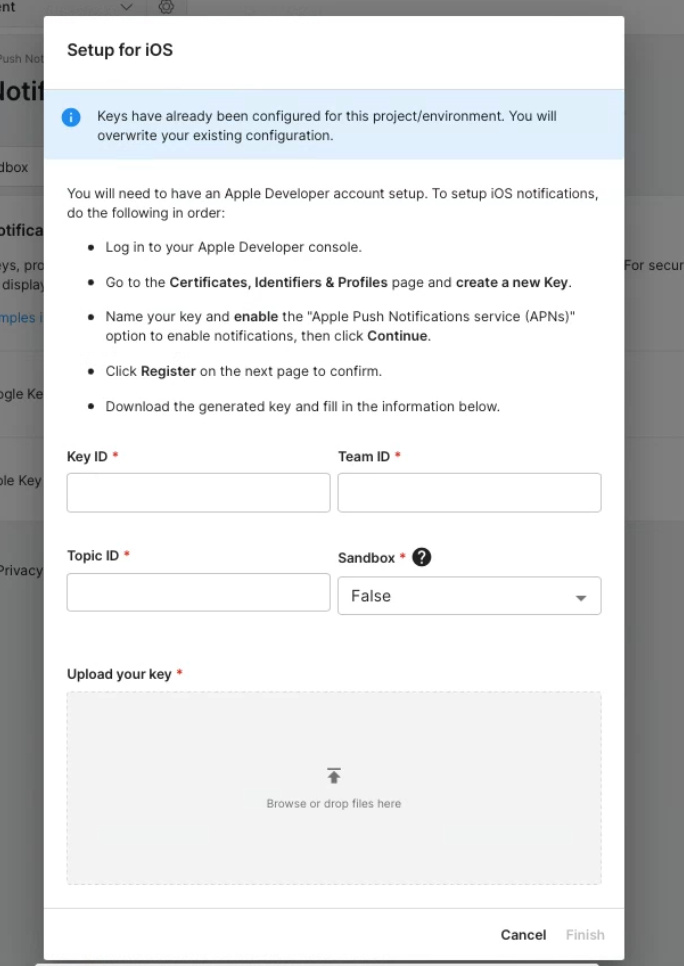
Key ID:
Log in to your Apple Developer console → Click the Certificates, Identifiers & Profiles page and select Keys. → Create a Key
Team ID:
Team ID is displayed under your account name on the Apple Developer console. >
Topic ID: < The bundle Id of your game>
The bundle Id of your iOS game is on the Apple Developer website.
Sandbox: < True / False >
False: This means sending messages to APNS in Production
True: This means sending messages to APNS in Sandbox
Remember you can only receive push messages by Sandbox = False for games built by TestFlight. While for local buily games in XCode, you can receive message by Sandbox = True.
Setting up Android:
- You need to create a Firebase Project with your Gmail account.
- While creating Firebase Project, you need to set up an authentication first. Then you will be able to see the Web API Key.
- Then use your Gmail account to log in to Google Play Store to create your Android game.
- Go back to Firebase Project, Project Settings → Integration → Select Google Play → You can link FireBase Project to your game in Google Play Store
- Then navigate Project Settings → General → you will be able to find the following info.
Firebase Web API Key, Project Number, Facebook App ID, and Firebase Project ID
- Then fill them in Unity Editor at Project Settings → Service → Push Notifications

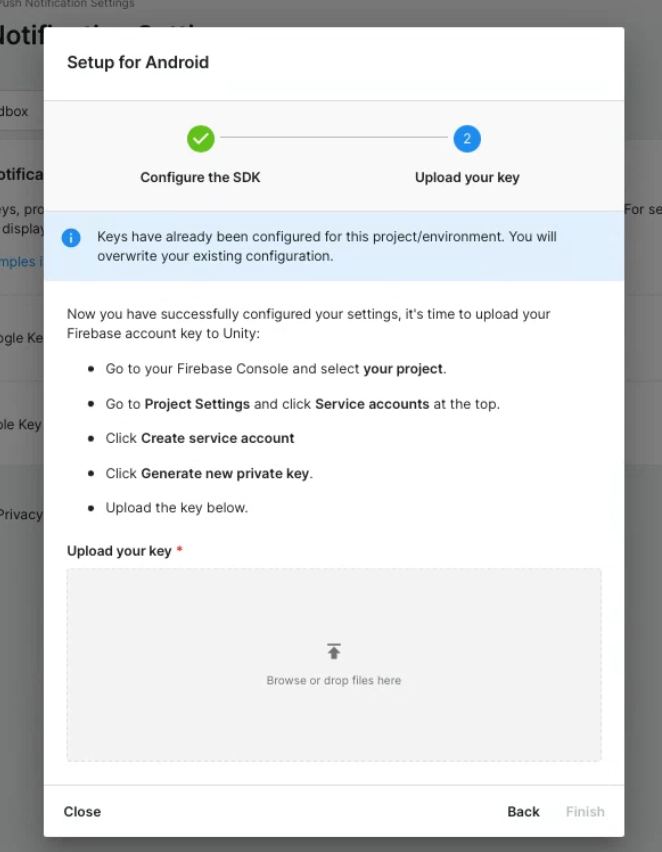
- Go to your Firebase Console and select your project.
- Go to Project Settings and select Service accounts at the top.
- Select Create service account.
- Select Generate new private key.
Then upload it here
3. Registering Device Token
Implement the following when starting the game.
await UnityServices.InitializeAsync();
// Note: This is the minimum required in Analytics version 3.0.0 and above to ensure the events with the push notification data are sent correctly.
// In a real game you would need to handle privacy consent states here, see the Analytics documentation for more details.
await AnalyticsService.Instance.CheckForRequiredConsents();

try
{
    string pushToken = await PushNotificationsService.Instance.RegisterForPushNotificationsAsync();

    PushNotificationsService.Instance.OnNotificationReceived += notificationData =>
    {
        Debug.Log("Received a notification!");
    };
}
catch (Exception e)
{
    Debug.Log("Failed to retrieve a push notification token.");
}
You actually can save push tokens to your backend if you want to send push messages for specific usage cases.
Because it’s possible to use Firebase Admin SDK to send messages by push token for Android or any Http libraries to send push messages for iOS on the server side.
4. Test to send and receive messages
Finally, click Send test Button to send a push message with the device token received from your device in the console log.
Ex. You can find device token in iOS’s log with XCode while Android can be seen in Android logcat in Unity Editor.
Summary
In this article, you learned how to
- simply set up Push Notification and avoid library conflicts to ensure the high stability of your games.
- set up Firebase Project and link it to your game in Google Play Store Console.
- implement codes to get the push tokens from the devices.
- test push notifications in Unity Push Notifications.
If you found this article helpful, please follow us on Facebook to get the latest tutorials in the future.
Thank you for reading!