
How to create a Serverless Cron Job in AWS Batch?
-
 Eric Wei
- 9 Min To Read
- 16 Oct, 2021
AWS Batch is a managed service to allow you to run batch jobs on AWS like big data analyzing or updating data in MYSQL. You don’t need to additionally provision or maintain an EC2 server to run cron jobs but simply set up Jobs, Compute Environment (EC2 or FARGAT), and Job Queue on AWS Batch.
You can combine with CloudWatch to periodically trigger Jobs of AWS Batch, changing the times of retrying jobs, even sending an alarm via SNS while detecting any unexpected failures.
In this tutorial, we will explore
- 3 Ways to Create Cron Jobs on AWS
- Advantages of using AWS Batch
- Design Cron Job on AWS Batch and CloudWatch
- Setup Cron Job on AWS Batch
Before we dive deeply, let’s explore how to create cron jobs on AWS.
3 Ways to Create Cron Jobs on AWS
There are 3 ways to set up cron jobs on AWS.
-
EC2:
This is a common and traditional approach to create jobs on Linux. Though it’s very easy to set up crontab on Linux, you need to spend more time maintaining the server. Also, it’s hard to achieve high availability.
-
CloudWatch and Lambda / ECS / EKS / Beanstalk:
-
CloudWatch + ECS/EKS/Beanstalk
CloudWatch aims to trigger lambda function or invoke API endpoints on ECS, EKS or Beanstalk periodically.
This can easily achieve high availability and scalability. But ECS, EKS, or Beanstalk needs to share computing resources to run cron jobs. This might cause some bottlenecks in API’s performance.
To ensure the high performance, you need additional work to separate cron job endpoints running in different EC2 nodes.
-
CloudWatch + Lambda
Lambda is a serverless service and can achieve high availability. However, Lambda has limited Memory, CPU resources, and the maximum execution time is only 15 mins.
-
-
CloudWatch and AWS Batch:
-
AWS Batch
This is a serverless service and can achieve high availability and scalability. You can increase Memory or CPU on daemon while cron jobs become slow. No restriction on the running time. Your cron jobs are independent of EC2, ECS, or EKS. This can eliminate potential bottlenecks on your architecture while running big data analysis on the same computing resources.
-
Three approaches mentioned above have their tradeoffs. Choose one solution to fit your development stack and save your time.
Advantages of using AWS Batch
-
Cost:
AWS Batch is free and only charges the underlying resources you consume while running batch jobs. When your cron job is finished, the resources will be cleaned up on AWS. This can greatly save your costs.
-
Scalability:
You can set up EC2 Spot or FARGAT Spot to automatically scale on the daemon. If you need more resources to analyze big data, you can tweak CPU and Memory accordingly. To automatically scale out the computing nodes can reply on FARGATE.
-
Availability:
AWS Batch is a Serverless service.
-
Maintenance:
No need to provision or maintain EC2 instances and worry about the availability of your server.
-
Log:
By default, you can check logs on CloudWatch to monitor your task is successful or failed.
Given the fact that AWS Batch is a cost-effective solution, let’s explore how to design and set up this server-less architecture for cron jobs.
Design Cron Job on AWS Batch and CloudWatch
The flow is shown below.
CloudWatch --> AWS Batch --> Job Queue --> Run Go Application in Docker --> Download Batch Script from S3 --> Run Batch Script
- CloudWatch periodically notifies AWS Batch Service to wake up cron jobs on Job Queue.
- Cron job will be running in docker on AWS FARGATE or EC2 in auto-scaling group.
- Cron job starts to download all the data from S3 including shell scripts and data.
- Then Cron job starts executing the bash script
You can build an application in Golang or other languages with Docker to run specific cron jobs. Your docker will invoke a script file to download all the data from S3 where you can place any shell scripts or data when needed. This is very flexible to analyze big data on the daemon.
Setup Cron Job on AWS Batch
Step1: Setup and Upload Scripts to S3
Before we get started, we need to prepare for the following.
- Create an image repo for your application on ECR
- Create an S3 Bucket
- Create an IAM to manage S3 Bucket
- Create fetch_and_run.sh
- This script can download cronjob.sh from S3.
- vim fetch_and_run.sh
#!/bin/bash
PATH="/bin:/usr/bin:/sbin:/usr/sbin:/usr/local/bin:/usr/local/sbin"
BASENAME="${0##*/}"
BATCH_FILE_TYPE="script"

# Change cronjob sell script to be executed on S3
BATCH_FILE_S3_URL="s3://<Your S3 Bucket>/cronjob.sh"

# Standard function to print an error and exit with a failing return code
error_exit () {
  echo "${BASENAME} - ${1}" >&2
  exit 1
}

# Check what environment variables are set
if [ -z "${BATCH_FILE_TYPE}" ]; then
  usage "BATCH_FILE_TYPE not set, unable to determine type (zip/script) of URL ${BATCH_FILE_S3_URL}"
fi

if [ -z "${BATCH_FILE_S3_URL}" ]; then
  usage "BATCH_FILE_S3_URL not set. No object to download."
fi

scheme="$(echo "${BATCH_FILE_S3_URL}" | cut -d: -f1)"
if [ "${scheme}" != "s3" ]; then
  usage "BATCH_FILE_S3_URL must be for an S3 object; expecting URL starting with s3://"
fi

# Check that necessary programs are available
which aws >/dev/null 2>&1 || error_exit "Unable to find AWS CLI executable."
which unzip >/dev/null 2>&1 || error_exit "Unable to find unzip executable."

# Create a temporary directory to hold the downloaded contents, and make sure
# it's removed later, unless the user set KEEP_BATCH_FILE_CONTENTS.
cleanup () {
   if [ -z "${KEEP_BATCH_FILE_CONTENTS}" ] \
     && [ -n "${TMPDIR}" ] \
     && [ "${TMPDIR}" != "/" ]; then
      rm -r "${TMPDIR}"
   fi
}
trap 'cleanup' EXIT HUP INT QUIT TERM
# mktemp arguments are not very portable.  We make a temporary directory with
# portable arguments, then use a consistent filename within.
TMPDIR="$(mktemp -d -t tmp.XXXXXXXXX)" || error_exit "Failed to create temp directory."
TMPFILE="${TMPDIR}/batch-file-temp"
install -m 0600 /dev/null "${TMPFILE}" || error_exit "Failed to create temp file."

# Fetch and run a script
fetch_and_run_script () {
  # Create a temporary file and download the script
  aws s3 cp "${BATCH_FILE_S3_URL}" - > "${TMPFILE}" || error_exit "Failed to download S3 script."

  # Make the temporary file executable and run it with any given arguments
  local script="./${1}"; shift
  chmod u+x "${TMPFILE}" || error_exit "Failed to chmod script."
  exec ${TMPFILE} "${@}" || error_exit "Failed to execute script."
}

# Main - dispatch user request to appropriate function
case ${BATCH_FILE_TYPE} in script)
    fetch_and_run_script "${@}"
    ;;

  *)
    usage "Unsupported value for BATCH_FILE_TYPE. Expected (script)."
    ;;
esac
- create cronjob.sh
- This script can download all the files from S3 to docker and execute the cron job application.
- vim cronjob.sh
#!/bin/bash

S3_CRONJOB_BUCKET="s3://<Your Bucket>"

echo "Args: $@"
env
echo "-- CGS Batch JOB! ---"
echo "jobId: $AWS_BATCH_JOB_ID"

# Copy all the files and data to docker application from S3
aws s3 cp "${S3_CRONJOB_BUCKET}/" .  --recursive

# Execute your cron application in Docker
/app/myapp

if [ $? -eq 0 ]
then
  echo "Successfully execute cronojb"
else
  echo "Could not execute cronojb" >&2
  echo "Failed to cronojb on $CURRENT_DATE"
  # Optional: send an alarm to Slack to detect errors.
  exit 1
fi

echo "Succeed to cronojb on $CURRENT_DATE"
- Then upload cronjob.sh to
S3://<your bucket>/cronjob.sh
Note:
- Docker will invoke fetch_and_run.sh to download all the data from S3 Bucket and execute cronjob.sh.
Step2: Build Cron Job Application in Docker
Next, let’s start to build the cron job application in Golang with Docker.
# Goto your batch_job folder
# Place fetch_and_run.sh in batch_job
cd batch_job
-
Create the build script:
vim buildImageAndUpload.sh
#!/usr/bin/env bash

if [ -d "tmp" ]
then
  echo "tmp exist"
  rm -rf ./tmp
else
  echo "tmp not exist"
fi

# Create tmp folder
mkdir tmp

cp go.mod tmp/
cp go.sum tmp/
cp *.go tmp/
cp fetch_and_run.sh tmp/

cd tmp

# Modify IAM to download files from S3
AWS_ACCESS_KEY_ID="<YOUR KEY ID>"
AWS_SECRET_ACCESS_KEY="<YOUR SECRET KEY>"
AWS_DEFAULT_REGION="ap-northeast-1"

# Setup the IMAGE URL for your cronjob on ECR
REMOTE_IMAGE="<YOUR IMAGE ON ECR>"

docker build --no-cache -t $REMOTE_IMAGE -f- . <<EOF

FROM golang:1.14.15-alpine AS builder

RUN apk add --no-cache --virtual .build-deps git musl-dev go && \
    apk --update add ca-certificates && \
    apk add --no-cache tzdata


# Change TimeZone
# ENV TZ Asia/Singapore

RUN mkdir /myapp
WORKDIR /myapp

ADD fetch_and_run.sh /myapp/fetch_and_run.sh

COPY go.mod .
COPY go.sum .

RUN go mod download
COPY . .

# Build the binary.
# If you have libs dependent on C lib, set CGO_ENABLE=1 to compile and link C lib.
# RUN CGO_ENABLE=1 go build -a -ldflags "-linkmode external -extldflags '-static' -s -w" -o /go/bin/myapp myapp.go

# Otherwise, run
RUN CGO_ENABLE=0 go build -o /go/bin/myapp myapp.go

# Remove cache files and fodlers
RUN \
  rm -rf /go/pkg/mod && \
  rm -rf /usr/local  && \
  rm -rf /root/.cache && \
  rm -rf /var/cache/apk/* \
  apk del .build-deps


FROM alpine:3.14

RUN mkdir /app
WORKDIR /app

# Change timezone
# ENV TZ=Asia/Singapore

ENV AWS_ACCESS_KEY_ID $AWS_ACCESS_KEY_ID
ENV AWS_SECRET_ACCESS_KEY $AWS_SECRET_ACCESS_KEY
ENV AWS_DEFAULT_REGION $AWS_DEFAULT_REGION

# Install bash
RUN apk add --no-cache bash

# Install aws-cli
RUN apk add --no-cache \
        python3 \
        py3-pip \
    && pip3 install --upgrade pip \
    && pip3 install \
        awscli \
    && rm -rf /var/cache/apk/*

RUN aws --version

COPY --from=builder /usr/share/zoneinfo /usr/share/zoneinfo
COPY --from=builder /go/bin/myapp .
COPY --from=builder /myapp/fetch_and_run.sh .

RUN chmod -R 765 /app/

ENTRYPOINT ["/app/fetch_and_run.sh"]

EOF

# login to AWS and change Region
docker login -u AWS -p $(aws ecr get-login-password --region <Your Region>) $REMOTE_IMAGE

sleep 3

# Upload to AWS
docker push $REMOTE_IMAGE
Build the Cron Job and upload to ECR:
- sh buildImageAndUpload.sh
At this moment, you can run and test docker on local to validate cron jobs.
docker run -it <Docker Image url on ECR>
If it’s fine, let’s set it up in AWS Batch.
Step3: Create Job
Log in to AWS Console –> AWS Batch –> Job Definitions –> Click Create
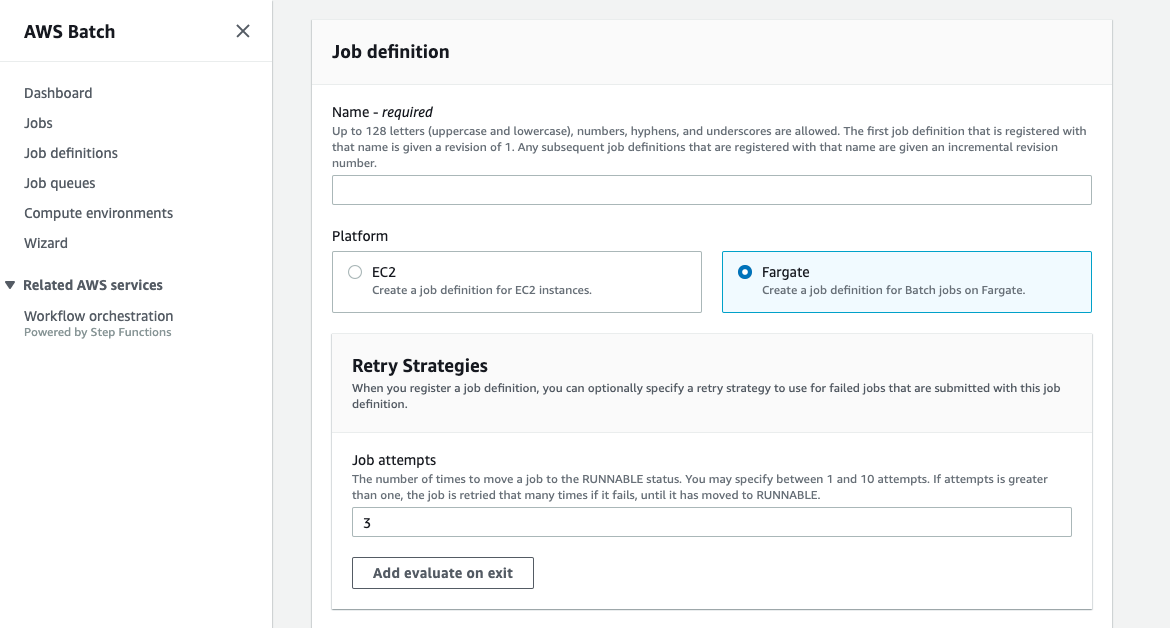
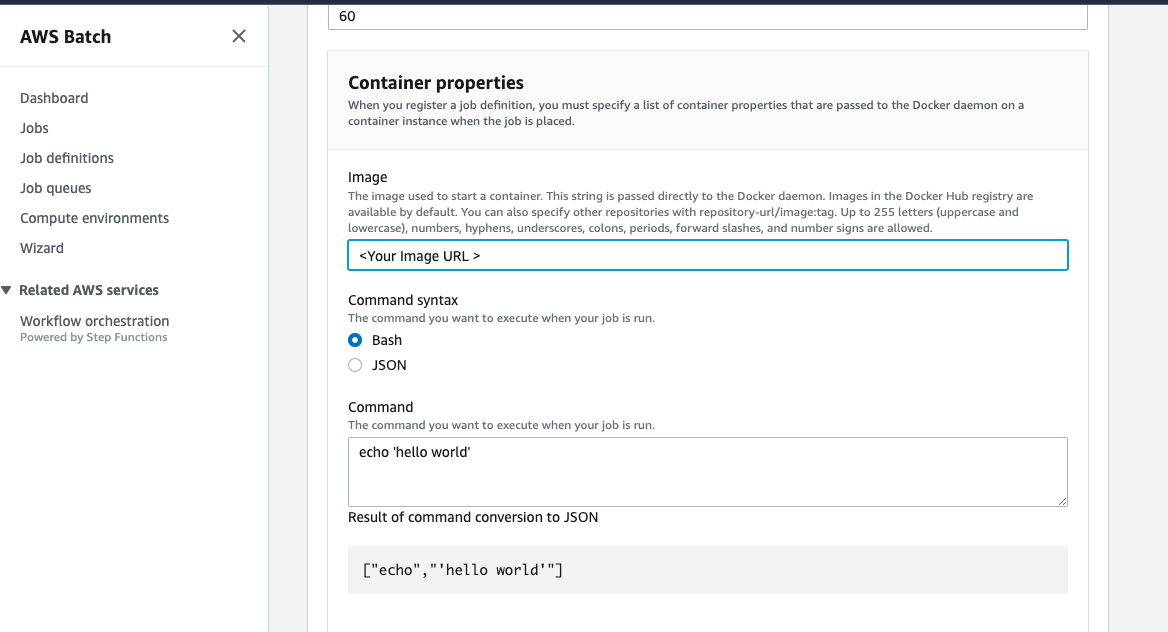
Image: <Your image URL on ECR>
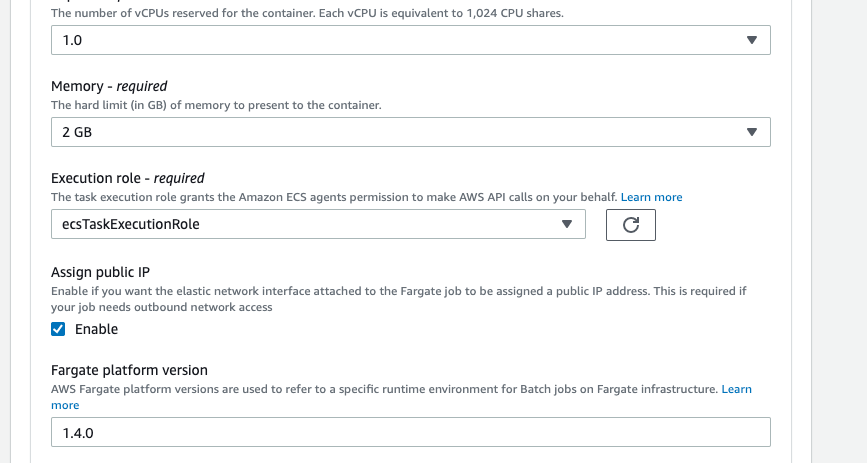
Enable Assign Public IP
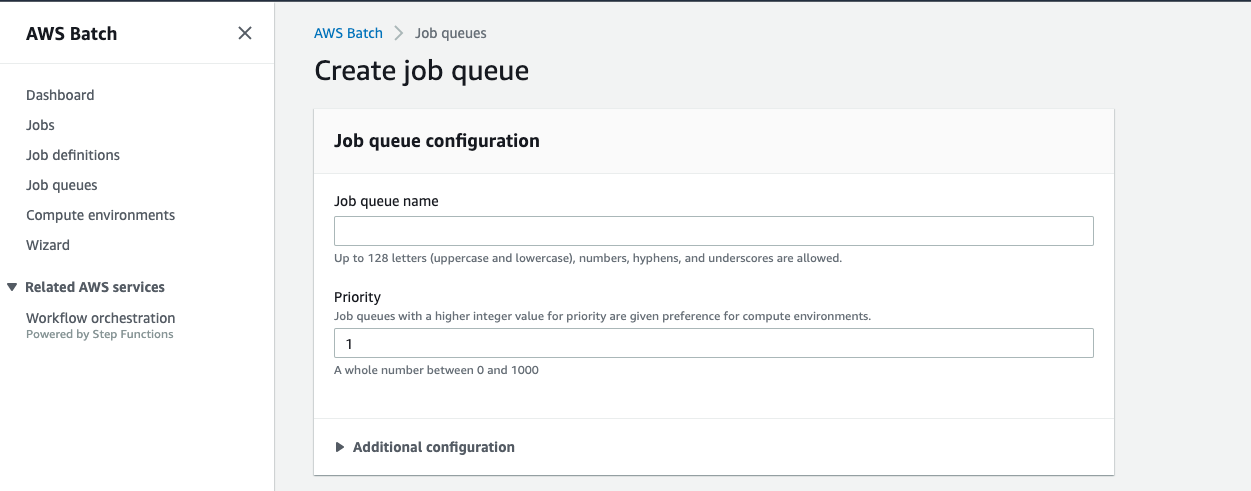
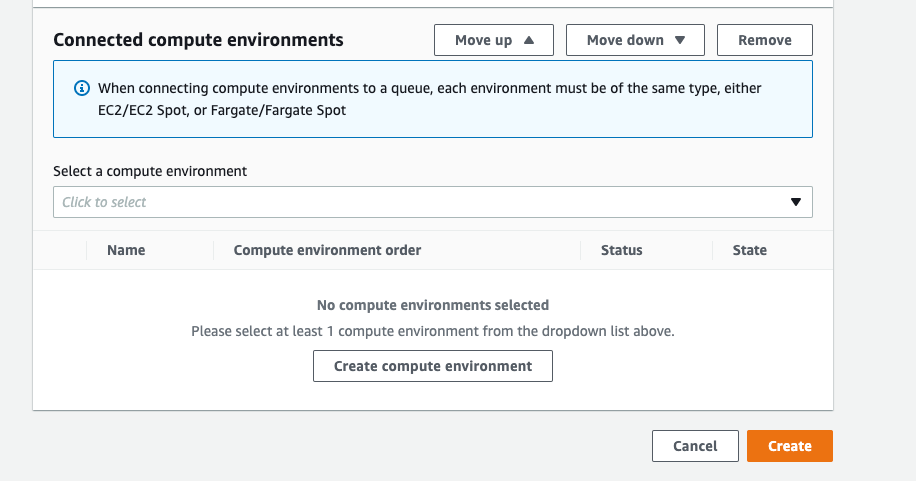
Step4: Create Job Queue
Create a Job Queue

Step5: Create Compute Environment
Select managed and enable compute environment.

Select Fargate Spot and specify CPU and Memory.

Select network.
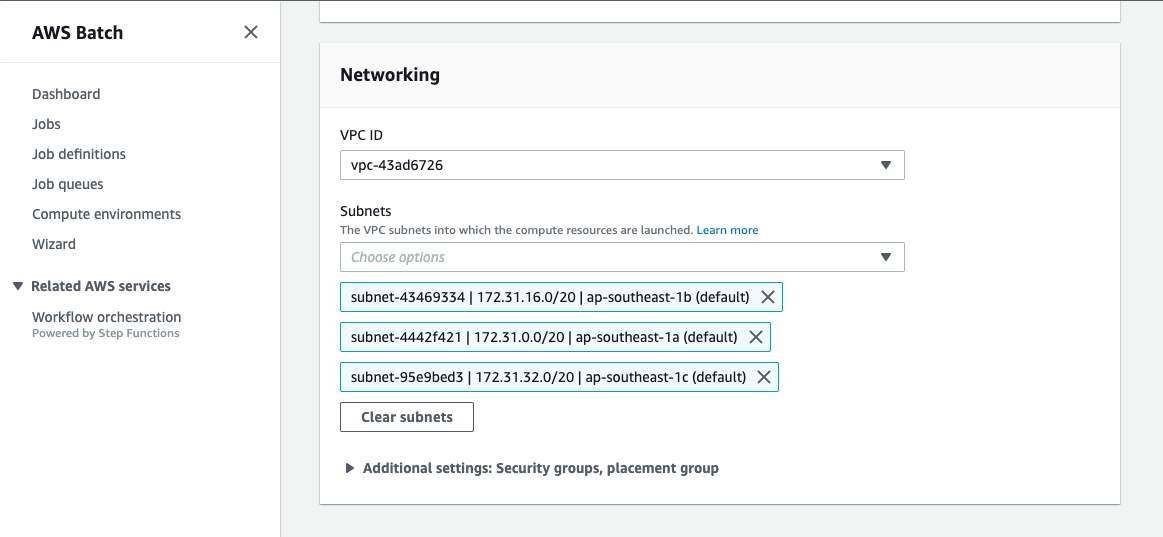
Create a job queue and set up compute environment.
Step6: Submit Jobs
Submit a job in AWS Batch to validate your cron job. Also, you can check logs on CloudWatch.
Conclusion
In this tutorial, you have learned different approaches and their tradeoffs to set up cron jobs on AWS - EC2, CloudWatch and ECS/EKS/Lambda/Beanstalk, CloudWatch and AWS Batch.
We recommend not using EC2 to run cron job because it may have single point of failure problems and it’s hard to smoothly scale and maintain. Another approach like Lambda, you need to pay attention to the limits in execution time, cpu, and memory resource.
ECS/EKS/Beanstalk needs to share the resources with cronjob. You need additional work to set up them properly to run cron jobs in different subnets or different EC2 nodes to ensure the same performance.
Therefore, AWS Batch might be the best solutions to run cron jobs in terms of cost, performance and availability. Lastly, we also provide a sample template to build a cron job in Golang which can improve your work productivity.
You might be interested in